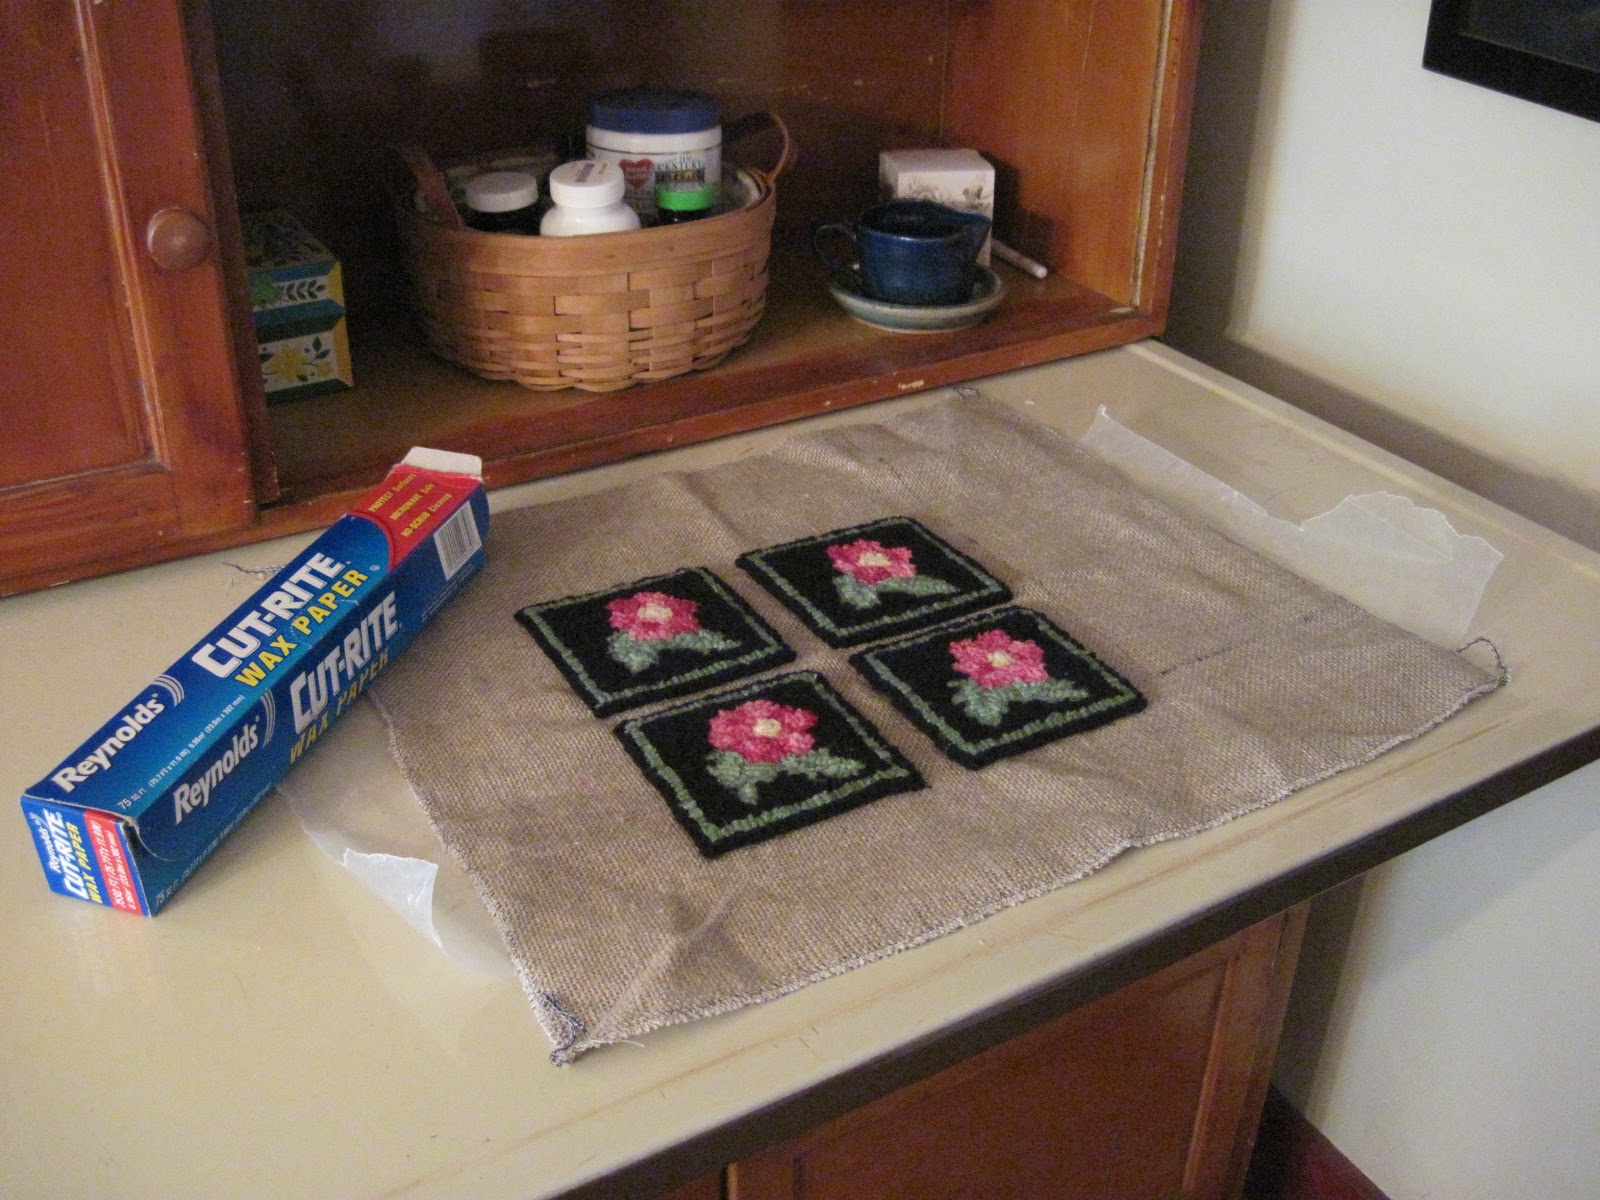
So...here were my Popham Beach Roses coasters hot off the hooking frame. I would like to note that I should have hooked them a little further apart for ease later in the process, but they did work out fine:


To me it's always like a miracle of the universe how the wool kind of pulls itself down and in, and here and there, and integrates itself in to a much better looking piece once the steam is applied. It's not terribly evident in photos, but it's very obvious in person.

After this I take the coasters and lay them top side up on a piece of waxed paper. I use plain Elmer's Glue and (usually with a brush but sometimes with a finger) I run the glue all around the edges of the pieces. The purpose of this is to keep the linen from raveling when it is later cut.
(A note about the pretty syrup pitcher sitting in the equally pretty saucer on the Hoosier cabinet: those were thrown and finished by my novice potter/ceramicist husband, Bill. I am encouraging him to open an Etsy shop of his own but he's not biting on that idea yet...)

The glue is best applied to both sides. I do the top side up first so that when I turn them over there's a little air gap for drying. I put down a new sheet of waxed paper when I flip them to make sure no glue that may have gotten on the old paper can get on the wool.

At this point, you have an option. You can either go have a cup of tea, visit with friends, do the laundry, feed the chickens, whatever, while the glue dries, OR, you can use a hair dryer on warm to expedite the glue drying. I did that today because I needed to get these coasters shipped.
Once they are dry, cut them apart leaving maybe 1/4 to 1/2 inch around the edges. Don't throw away your scrap linen! I have been admonished to keep it by a) my mentor Connie who uses it sometimes to extend a piece for better fit on a frame and b) by Lou, owner at the Secret Garden gift shop in Oxford, Maine who said she has crafters who use it to make little primitive art pieces. So...waste not, want not I guess!

Next, cut a piece of a double sided heat activated plastic about the size of your coaster plus edge. I use something called "Heat Bond," but I know other hookers and crafters use other products that they have a preference for. This material is inexpensive and easy to find, and just as importantly, easy to work with. I've tested my coasters and trivets and this material also keeps any moisture off the surface you are using the item on.

Then, place the Heat Bond plastic side down on to the back side of the coaster, apply heat with a medium iron, and let cool for a moment. Peel back the paper and you'll see that the back side of your coaster is now plastic coated.

Next....take the wool you'd like to use as your backing (I used a pretty black herringbone I dyed last spring) and place it over the plastic side. Again, apply heat from the iron. I find that using a damp cloth between the backing and the iron creates a steam effect that helps transfer the heat through the wool backing and creates a nice tight bond.

Let it cool and this is what it's going to look like:

This next step is, I think, the scariest part but you get used to it. Trim away the excess around the edges very carefully, getting as close to the edge as you can without nipping any of your loops. My mentor/teacher, Connie Fletcher, uses pinking shears and leaves a cute little pinked edge. I have also seen that method written up in magazines. For these pieces I opt for a straight edge invisible from the top, but you could do anything you liked.

After I have the edges cut I go and nip the corners to itty bitty 45 degree angles because it makes them look a little tidier to me. (This photo was taken on my sons' air hockey table - kinda stark white Etsy-ish, no?)


So that's it. In my case, I wrapped these up nicely and shipped them to our customer. In your case, you might want to mix a gin and tonic and test out your handiwork. :) Let us know how you finish pieces like this, and happy hooking! ~ Beth

Very clear concise instructions and pics. Thank you. Lovely Coasters.
ReplyDeleteThank you for this post! I am contemplating making coasters and this was really helpful!
ReplyDeleteHappy New Year Beth ! Great idea for backing. If I have a raw edge, I usually use a sharpie or paint the edge to match the mat. Also - before hooking a mat, I sew around the edge of the design with zig-zag stitch, straight stitch to keep from raveling. No need for glue. Susan Ferraro
ReplyDeleteSusan Ferraro
Hi Susan! The glue is only for finishing these coasters in this way. All of our patterns are made with serged edges (including coaster patterns), but since in this case you're cutting the edge all the way up to the backing, the glue is what keeps it from potentially raveling. The Sharpie is a great idea if you don't want to see the natural color of the linen on the edge. I've done that too. Please check out our newer blog site and main page at http://www.parrishousewoolworks.com. Thanks!
DeleteJust starting to explore different methods for finishing projects. As a beginner, I focused on the hooking and needle punching, but now is the time to finish. Love your clear instructions and lovely coasters. Thanks!
ReplyDeleteThanks! For more from us, please check out our newer blog site and website at http://www.parrishousewoolworks.com.
Delete