Monday, September 30, 2013

Homemade Lavender Laundry Detergent


Hi!  Jen again.  I wanted to share this recipe for making homemade lavender scented laundry detergent.  This November it will be two years that I've been making my own detergent.  I was inspired by my crafty sister Tiffany who has been making it MUCH longer.  The main advantages to homemade detergent is that you know exactly what's going in AND it will save you a couple hundred dollars a year.  Yep, you heard it correctly.  Making your own laundry detergent will save you lots of money! 

Many of my friends say they don't have time but if you have twenty minutes every two months to spare, you have time.  

A common myth about detergent is that you need lots of foamy, soapy bubbles to get your clothes clean.  Your homemade soap will clean and freshen just as well as store bought soap without any residual product on the clothing.  If you want a boost to whiten whites you can add about 1/4 cup of hydrogen peroxide to your wash or just spray around shirt collars and stains.  
If you find that you feel empowered making your own laundry soap, you can even make your own fabric softener and dishwashing detergent.  Look for that in an upcoming blog.

You will need the following items and ingredients:

1 cup of Borax
1/2 cup of Washing Soda
1/2 a bar of Fels Naptha or 1 full bar of your favorite soap
Pan to melt your soap
9 quart bucket
Large Pyrex measuring glass
Silicon or plastic spatula
Super cool vintage cheese grater or food processor
A small bottle of lavender essential oil (optional)
Two 1 gallon containers
A funnel or a family member/friend to help you balance the bucket while you pour

  Grate either a full bar of your favorite soap (I love Dr. Bronner's Lavender Soap) or 1/2 of a bar of Fels Naptha. 
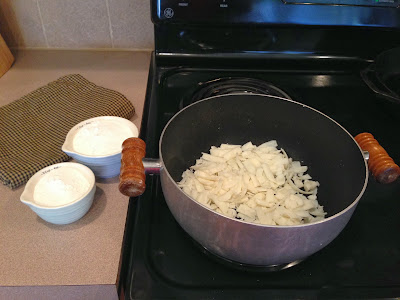
 Measure out your Borax and Washing Soda. 

 Place your grated soap flakes in your pan.

 Add 6 cups of water to the soap flakes, turn on medium heat, and stir gently until soap is fully dissolved. 

 Next add your Borax and Washing Soda and stir until completely dissolved.  The mixture will begin to thicken into a gel. 

Turn off the heat. 

 Pour 4 cups of hot water into your bucket. 

 Carefully, pour the soap mixture into the bucket of hot water and stir until completely mixed. 

 Add 22 cups (or to the 8 quart line) of water to your soap mixture.  This is where the large Pyrex measuring dish comes in handy. 


 Add lavender essential oil (or your other favorite scented oil).  I use about 20 drops because my soap also has a lavender scent but you can add as much or little as you'd like. If I use Fels Naptha I rarely add essential oil because the smell is already wonderfully fresh.

Using your handy funnel, pour the soap in immediately. Don't go take a bath or sit down with your favorite TV program because the soap will begin to gel. You want it to gel in the containers and not your bucket because it may form clumps while you pour  and you want the gelled part evenly distributed between each jug. 

 And look!  You now have two gallons of detergent.  How easy was that? I usually let mine gel overnight but I have used it just a couple of hours after making.   You'll want to give it a shake each time before using it to remix the solution in case it separates a bit.  If it gets too gel-like, just add a bit more water and shake.  I use a regular liquid laundry detergent size capful for each load.  


For more information about making laundry detergent check out: www.thefamilyhomestead.com

Thursday, September 26, 2013

Organizing the Pantry...if you dare.


Hi!  Jen again.  If you're like me, this is how you feel most days.


The thought of organizing the pantry is probably last on your list to-do and frankly, who cares if you can just shut the door when company comes calling!  But if you have one lazy Sunday and can't think of anything else you'd rather be doing....
Ok I laughed out loud too, but realistically it will make your life easier.  For example, how many times have you been to the grocery store and bought the same thing twice because you didn't see it buried under five boxes of pasta? Or there's a strange smell permeating from a rotting potato that fell behind the 2 wide open stale bags of chips?
The biggest reason for organizing your pantry in my opinion is to keep out pesky critters like pantry moths.   And it doesn't matter where you shop, those little pests find their way in and wreak havoc on just about everything. 


For about $6, you can find these great glass canisters for storing all your flour, sugar, and oatmeal.  I like to buy pancake mix but hate keeping the box (remember you're just asking for pantry moths to chew through the cardboard).  I take a peel and stick label, write the instructions, and attach it the jars.  All these are easy to mark and date and you can use the same labels that you'd use for canning jars.  


And speaking of jars, I like to use vintage whenever I can.  How cool are these old Ball jars!?!  You can find these all day at your local flea market, garage sales, and antique stores. Tea and coffee also look great in giant clear glass canisters.


You can get BPA free plastic containers at most stores.  These cereal-sized ones also work great for chips.  I'm just not a fan of boxes stacked in the pantry so I try to get rid of as many as I can.  Not only does your food stay fresher but they just look nicer. 


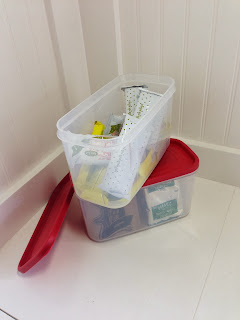
These Rubbermaid containers are great for storing granola bars, pop tarts, and oatmeal (a pantry moth's favorite snack).


I do a lot of wool dyeing and soap making so these supplies should be kept separate from all other utensils and food items. These totes are so inexpensive now and can be stored in the bottom of your pantry. 


Another tip - bread box! People just don't use them as much anymore but this red vintage 1930s one holds quite a bit and well, it just looks plain cool! 

Hoped this inspired you to get a bit more organized and remember....
No matter how chaotic things get, relax, sit down, and have a cup of tea!!


Wednesday, September 25, 2013

Making Applesauce at The Parris House


Hi.  It's Beth blogging today and it's fall in Paris, Maine!  Here at The Parris House we have several apple trees which bear copious fruit every other year.  It's an "on" year and so we are faced with apple overload.  My husband picked about 24 pounds of apples from the trees last weekend, and of that, I cooked down about 18 pounds which yielded four quarts - one gallon! - of delicious applesauce.  It's a super simple process which I will outline in this post.


So here are the apples.  Those little itty bitty green things on top of the pile are pears from a positively ancient tree we also have in the yard, and which my husband subsequently made a pie with, but those don't figure in to our applesauce!


To give credit where it's due, the applesauce recipe comes from the Ball Blue Book Guide to Preserving.  I have used this small but amazing book for making pickles, jams, and other preserved foods for several years now and every recipe has been bomb proof.  It also explains the very important steps for a variety of preserving methods, and I have to say right up front:  always follow the preserving directions for a recipe meticulously!  Jen is a microbiologist and can attest to what happens if nasty critters (my very unscientific term - hey, I'm not the scientist...) get in to your food.  So please, whenever you can or preserve, get a solid book like this one and follow the directions to a T.


I had to weigh the apples.  The recipe said 2.5 to 3 pounds of apples per quart, although I don't think it quite worked out exactly that way.  I got 4 and about 3/4 quarts (I didn't preserve the last 3/4 quart) out of about 18 pounds of apples.  

Next it was time to peel and core the apples, much to the delight of...


our hens!  Do you know what it looks like when you walk outside with a bowl full of fruit or veggie scraps here at The Parris House?  It looks like this...


Those would be stampeding chickens.  Too bad I wasn't taking video with sound.


While I was peeling, coring, and cutting up the apples, I ran the quart jars through the dishwasher.  Even though I had done this, I also put them in to simmering water prior to filling them.  Again...please follow the directions in your canning book precisely.


The apples went in to a large stock pot on the stove and cooked down in to a very soft state.  Here is where  you have some options.  I chose not to add sugar or spices to my applesauce and leave it just 100% apples.  I did this because I use applesauce for a variety of recipes and wanted it to be just apples to leave it versatile.  Sugar or spices can be added upon opening if desired.  Honestly, I like the pure taste of apples in my applesauce and choose to eat it just like this, but you can do as you desire. The Ball recipe book has the suggested amount of sugar if you'd like it sweetened.


Once cooked, it was time to puree the extremely hot - be careful! - apples in the food processor.  You could also use an old fashioned crank food mill.  I lined it up so that I could take the hot apples, put them through the processor, and in to a clean pot for a little further simmering.


Whirrrrrrrrrrrrrrrrrrrrr!  Please don't mind the messiness on the handle and down the side.  =/


At this point I was bringing water in my hot water boiler canner up to the boiling point.  The pots behind my enamel canner hold the simmering empty jars and the lids and tools, all sterilized.  Again...I know you're sick of hearing it...follow your canner's instructions.


Time to fill the jars using the sterilized equipment!


Once filled, I carefully lowered the jars in to the boiling water in the canner, and put the lid on.  Putting the lid on helps insure that the water will remain at the boiling point.  These jars are completely immersed with 1 to 2 inches of boiling water over the lids. This particularly recipe called for a 20 minute boiling/processing time.   I'm sure processing time may vary according to your recipe and/or jar sizes.


While they were boiling I admired the eating apples we'd reserved out.  Yum.  Some of these went in to an apple cranberry crisp for our studio hookers a couple of days later.


OK!  Once the processing time was up I super carefully, using my canning tongs, removed the jars from the boiling water bath and set them carefully on the counter.  After a few minutes you'll hear the tell tale "PLINK!" of the jar seal lids popping down from the vacuum created as they cool.  This must happen.  If you have a jar that fails to do this, and therefore fails to properly seal, the contents must be either refrigerated and eaten in a reasonable amount of time, or you could try reprocessing that jar with a new seal lid.  Again, follow your instructions!  Do not touch or disturb your cooling jars for about 24 hours.  Just let them rest before storing them in a nice, cool dry place.  


As you can see, there are plenty of apples still on our trees.  There are even a few on our ancient tree that probably remembers the 19th century Parris family, who now rest just beyond its branches.


I know this much.  When it's time to peel another 18 pounds or so of apples, someone will be ready to take care of the scraps!


Thanks for reading and we'd love to hear about your fall preserving adventures too!  Happy harvest and happy hooking!  - Beth

Monday, September 23, 2013

Cold Process Lavender Soap


Hi!  Jen from Parris House Wool Works here.  I have been wanting to try my hand at homemade cold process soap for several years now but haven't summed up the courage until recently.  Since there is lye involved, the thought of blowing up my kitchen or melting my skin off, kept me from taking the plunge.  What changed?  I turned 40.  I have crossed the threshold and entered the land of I-Could-Die-Any-Day-Now.  Life is really too short to worry so much.  Don't you think?
I STILL didn't start immediately.  It took me about 3 weeks or so to choose a recipe, order the supplies, and watch about 200 YouTube videos....and then watch them all over again.

As you can see, I was PREPARED and probably bought too much.  Don't tell my husband.


One of my favorite scents is lavender.  I just planted it in my garden this year so it hasn't taken off yet so I ordered this French Grade 1 lavender from www.brambleberry.com . Bramble Berry is where I ordered most of my soap supplies including a great 2 lb mold with silicon liner.
I also used lavender essential oil, shea butter, virgin coconut oil, sustainable palm oil, and extra virgin olive oil.


It's very important to measure the ingredients very carefully so I used this digital scale that I purchased from Wal-Mart.

Measuring out the palm, shea, and coconut oil.  I read that you don't want to add too much coconut oil as some people may be sensitive to it.
One of my favorite things in the world EVOO.  I was concerned this would cause my soap to turn a green color but it didn't effect the final product.
It is important to wear gloves, use safety goggles, and also keep a container of white vinegar nearby in case you splash some lye on yourself because it stops the burning.
I ordered lye flakes from Bramble Berry.  It was so easy to pour and measure.  Remember to always add LYE TO THE WATER.  Never add water to the lye as it can cause an explosion.  Make sure when you mix the lye water to do so outside or in a well ventilated area and avoid breathing in the fumes.
I sprinkled lavender buds in the bottom of my mold so that they would coat the bottom of the bars.
Melting the hard oils.
I put the lye water in a cold water bath.  You want your hard oil and lye water temperatures to be within 5 degrees of one another before mixing.
Cooling the hard oils.
After mixing the oils and the lye water with a stick blender, I added the lavender essential oil and the buds.  You know the soap is ready to pour in the mold when you trace.  Trace is the the trails on the top of the soap that form when you drizzle some over the surface of the mixture. 

Poured in the mold and sprinkled lavender buds over the surface. I also sprayed the top of my soap with 91% alcohol to prevent soda ash from forming after it hardens. 
It's time to put the soap to bed.  It must sit for at least 24 hours before cutting. 

The final bars! Cold process soap needs to cure for 4-6 weeks before using. 


The soap recipe I used can be found at www.how2soap.com.

Check Parris House Wool Works for homemade, 100% natural, no dye or artificial fragrance soap for sale later this fall!