Friday, December 7, 2012

What's Up for 2013?

If you do not already belong to the on-line group Rug Hooking Daily, I highly recommend it.  Every day there is a discussion question, and there are sub groups in every imaginable category - wool dyeing, regional groups, etc.  Today's Daily Discussion caught my eye.  It is:  What are your creative goals for the year 2013?  The answers vary from completing unfinished pieces to finding one's own personal style to organizing the old wool stash.  I have been thinking hard about what my own creative goals are for 2013, and so I thought I'd share them here and invite you to share yours too.

Several observations in 2012 have led me to believe that there is more to the rug hooking community than I at first thought.  When I first took up hooking in 2011, I knew immediately I had found the "hand craft for me."  What I didn't know was that I would be so driven to design new patterns, dye my own wool, and launch a small Etsy enterprise, but that soon followed.  During 2012 I continued to think that perhaps this was a nice "side business" but that I could probably not make it a serious endeavor.  I have changed my mind.

During 2012 I had the privilege to get to know my mentor, Connie Fletcher of Seven Gables Rug Hooking, much better and observe her impeccable business practices and successes in all aspects of her art.  Through her undying encouragement and teaching, I have gained a little more confidence in what I do and, more importantly, what I might be able to do in the future as I learn and improve my own art.  I have met and learned immeasurably from our local group of hookers and knitters who meet at Artful Hands Fiber Studio.   I have also been buoyed by the enthusiasm of some very special customers who have bought my pieces, large and small, and expressed their appreciation and offered, unsolicited, ways that they might also promote my work.  Additionally, I have sold a few pieces at The Secret Garden Flowers & Gifts and been invited to show and sell my work at Smedberg's Crystal Spring Farm in 2013.  I have been invited to two large craft fairs, one in Massachusetts and one in New Gloucestor, Maine, out of the blue, and, of course, am planning on doing some with United Maine Craftsman in the coming year as well.  The Maine Made - America's Best program accepted my work in 2012, and Jen and I are humbly hoping to show our work for the first time at Hooked in the Mountains 2013 in Shelburne, VT.  All in all, 2012 has been a year of good starts for Parris House Wool Works in the form of these absolute gifts given us by other hookers, artisans, shop owners and craft organizations.  I am overwhelmed by how supportive these people have been from the moment I expressed an interest in hooking.  The love of the craft is evident in their enthusiasm and in their willingness to pass it on, often with an astounding spirit of generosity.

My goal for 2013 is to capitalize on those good starts and be worthy of all the help we've received in 2012.  Jen and I hope to add more patterns, hand dyed wools, and finished pieces to the Etsy shop.  My husband, Bill Miller, has also become quite a potter in 2012 and we plan to introduce his hand thrown snip & scissors holders to the shop.  We have been hard at work designing pottery pieces that will be beautiful, but just as importantly, functional for this purpose.  When I asked on our FB page for feedback on what you'd want in a snip container, one of the hookers indicated that her floor worked pretty well!  I loved that answer.

In short, the level of opportunity I see in the hooking world is broader and deeper than I first anticipated.  I see it here in New England, and also when I travel to the Canadian Maritimes, which feels like - whether it is or not - the hooking epicenter of the world.  My experiences in the world of wool in 2012 have shown me that that silver ring I wear daily, inscribed with "Do what you love, love what you do" is not just about wishful thinking.

What am I up to right this second in terms of hooking?  These humble little things...


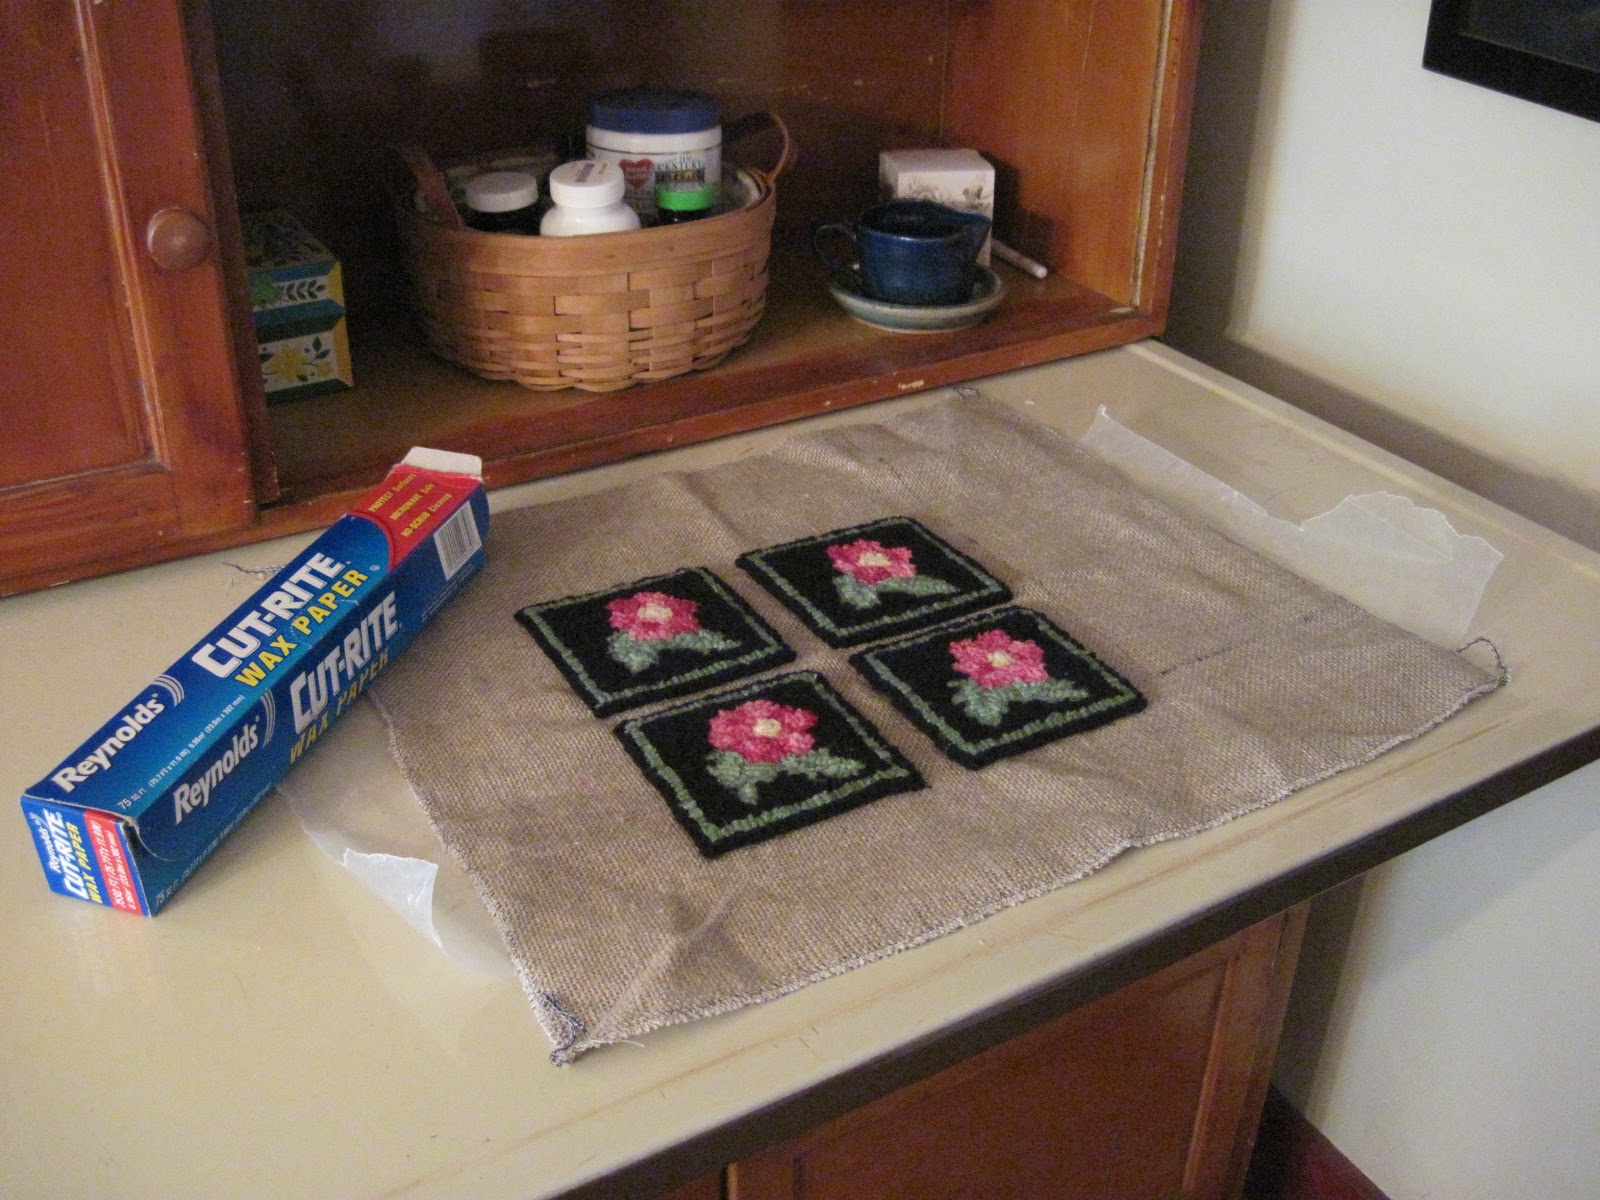
  These are a set of primitive Christmas coasters I'm working on for the Women's Council of Realtors (Portland, Maine Chapter) silent auction as a donation.  Please note that if I were to sell this pattern I would not put it on an inconvenient strip of linen this way - I'd make it 2 over 2 with lots of edge for the hooking frame, but as I had this strip of linen in my stash I thought, "Why not?"

Following these, I have to hook a Seven Gables designed chair pad as a Christmas gift for my aunt, and then another one of these...


for the same woman in Florida who bought the first one - apparently she wants another!  And by the time these are finished it should be January 2013 - time for all that is new.  Stay tuned.  What are you working on?  Share your work and your photos here!  Happy hooking.  : )

Wednesday, December 5, 2012

Lake Willoughby Rug - Complete!


Remember the blog post a little while back?  The one about transferring designs?  The rug featured in that post is finished and I thought I'd share the photos.  You'll recall that the design for this was done by Jen's husband, Dan Rosenburg, and the photos are shared by permission of my customer, Kate.


Sunday, November 18, 2012

Hooked in the Mountains XVI - Wow!

Entry to Hooked in the Mountains XVI at the Shelburne Museum Round Barn, Shelburne, VT
At the urging of my teacher and mentor, Connie Fletcher of Seven Gables Rug Hooking, I attended the Green Mountain Rug Hooking Guild's spectacular hooked rug show, Hooked in the Mountains, which just closed on November 17th.  This was held in the round barn at the Shelburne Museum, in Shelburne, VT, which is a bit of a spectacle in itself.  This year there was a lot of construction going on at the museum and therefore the museum was not open in its entirety, however, I do believe next year the Shelburne Museum plans to be open during Hooked in the Mountains XVII.  This is important to note, and to double check on next year, because if you go it's worth taking a couple of days to see both the rug show and the museum.  Additionally, the rug show runs for an entire week (hours 10 - 5 daily) and offers workshops and lectures on the craft.  I was able to listen in to a lecture on color, which was very interesting.  The entry fee was $8 for adults, $6 for seniors, $15 for week long passes, and kids under 12 free.  I knew I was among friends when my smart phone informed that the wireless free WiFi network set up for the show was named "Happy Hooking."

And speaking of friends, can't you just somehow see yourself in this lovely rug, replete with the bathrobes and bottle of wine?

Designed and hooked by Jeni Nunnaly of Cape Neddick, Maine
The drive for me, from Paris, Maine, is about three and half hours through the White Mountains in New Hampshire.  I left early in the morning and arrived just before the show opened for the day at 10 a.m., having seen the Presidential Range up close and personal and bedecked in snow.  Connie and an another accomplished hooker friend were planning to meet me there by noon, so I had a couple of hours to just wander around the show alone.   This was likely for the best because I think I went from rug to rug in a state of astonishment, awe and admiration (a new "3 A's" maybe?) and probably could not  have been a very sensible conversationalist had we all arrived together.  By the time Connie and her friend arrived, I had been around the round barn, on all three floors, a couple of times and thought I might be sufficiently re-collected.  I wasn't.  Well, I'd have to ask Connie, but I think I was still a little hyper...following Connie around as we viewed the art together and chattering away about this or that technique or detail that blew my mind about so many of the pieces.  I think I owe her an apology.   By contrast, Connie has been hooking for decades and seems to be able to maintain calm in the presence of wooly awesomeness.  This is good because she's a creator of wooly awesomeness herself.

The rugs were from many American states and Canadian provinces, although I'd say the majority of them were from the eastern seaboard.  All exhibitors were members of the Green Mountain Rug Hooking Guild, which Jen and I have joined in the humble hope of exhibiting there next  year.  The variety of styles, themes and subjects was extraordinary.  There were contemporary art pieces and very primitive pieces.  There were maritime themes, personal memoirs, causes and political opinions expressed in wool.  I got seriously schooled on the style of Pearl McGown and there was a very small, but lovely, landscape study in the style of Deanne Fitzpatrick.  There was an entire corner (you know, if a round building can have corners of sorts) devoted to chicken designs (yay!).  There were three dimensional pieces, and functional pieces, for example chair and ottoman upholstery and stair riser covers.  Most of the pieces were designed by the men and women (mostly women) who hooked them, but some were pieces by other designers.  There was a monochromatic piece - yes, just white wool - in which the design was done strictly in loop height and texture.  There was a piece framed beneath a window frame.  There was a triptych, and also a 3D bird's nest.  And, in case by now you are positively aching to actually see what these incredible works looked like, I did take 110 photos.  Yep.  And with around 350 rugs in the show, I didn't even shoot the majority of them.   Here is my Photobucket file of the photos (click on "view as slideshow"), each with a shot of the card that shows who the artist was and any back story that person offered for the piece:

Beth's Hooked in the Mountains Photo Album

I had the privilege to speak to a couple of the artists while I was there.  I explained that I was a newbie, and that I was humbled and inspired by their work.  Here is the interesting thing:  each artist I spoke to expressed to me a genuine humility, one, Cathy Henning, speaking of her own creative journey over the years as she's tried new things.  She had been hooking for decades, since I was a child, and her work was breathtaking and original.  Not only was it original, but her work spanned multiple styles and mediums.  She even had pieces with birch bark backings.  This was clear: no matter how long we pursue this art, or how accomplished we become, there is always something to learn.  I know this by speaking to the gurus at the show, and I look forward to a lifetime of learning in this craft.

I would be remiss if I didn't mention the vendor area on the lower level of the round barn.  This was truly an extravaganza of woolmania (is that a word?).  There was all manner of wools - off the bolt and hand dyed, accessories, finished pieces and doo dads (use your imagination - if you can imagine it, it was there).  Punch needle has been a mystery to me and one of the vendors gave me a demo.  It was fascinating - probably not for me, but fascinating and her work was lovely.  Truly, I'm just fine with the challenge of rendering a pattern the way I really want it to look working on the "right" side with a hook let alone punch needling my way through a pattern from the "wrong side."  I take my hat off to all of you punch needle artists out there.

Vendor area at Hooked in the Mountains XVI
I did buy a pair of new hooks that I found fascinating and beautiful, from Cherylyn Brubaker's shop, Hooked Treasures.  I got one for me and one for Jen.  The actual hooks (the ends) are a bit smaller than my favorite hook from Mahone Bay, NS, but this is actually perfect as I have a fine shading pattern by Cherylyn that I have to resume working on some fine day.  Take a look at these:


How the artisan got those little rings carved out is beyond me, however, these hooks are fun to use with their little rings softly clattering away as you hook.  I thought it might be distracting - it's not.


I have saved the "rug that made me cry" for last.  This rug was made by Anne Cox of Tenants Harbor, Maine.  I wish I could sit down to tea with Anne, because just by looking at this rug I know we share a love for many of the same things.  It is a view of Tenants Harbor, Maine and it is based on a poem, the words around the border being:

"Look, I want to love this world as though it's the last chance I'm ever going to get to be alive and know it.  So this is the world.  I'm not in it.  It's beautiful."

The rug is very, vary large - I would guess perhaps 8 feet by 4 feet although someone who was there may correct me if necessary.  At any rate, the photo does not do it justice.  And yes, I literally cried when I viewed it.
"So This is the World" by Anne Cox, Tenants Harbor, Maine
There was a viewer's choice contest where each attendee could vote for his or her favorite rug.  This rug got my vote.  It made me feel as though I was standing on the Maine coast, with the gratitude and awe I feel whenever I behold the beauty of my home state, and the words were an affirmation for much that I have been pondering in my own life for the past several years.  This, and many of the pieces I saw at Hooked in the Mountains, are examples of rug hooking transcending hand craft and moving in to the realm of serious art.  If I can create a single piece that moves someone as much as this did me, I will have succeeded in my own right.

The Hooked in the Mountains show is a great inspiration, whether you are a rug hooker or not.  The northern New England area has so much to offer - why not take a week or a long weekend to take in this amazing show next year and relax in one of the most beautiful settings on the east coast?  And maybe - maybe - if you come next year you'll get to see some pieces by Jen and by me.  :)

Happy hooking!  ~ Beth

Thursday, October 25, 2012

Finishing Hooked Coasters - a No Sew Method

We recently got an order for my Popham Beach Roses set of four 4" x 4" hooked coasters.  Since I had given the set we had stocked to a Popham Beach, Maine loving friend as a gift, along with the matching 8" x 8" trivet, I had to scramble to make a new set for our customer in California.  I popped her an Etsy message letting her know that I'd have them finished and shipped by today; she ordered them Sunday evening.  Luckily, I met the deadline.  I thought along the way I'd photograph the process of finishing them and throw it out there to see if any other hookers want to offer their advice on the process too.  There are a lot of ways to finish items like this.  My particular method evolved through trial and error and personal preference after picking the brain of my hooking mentor, looking at her items, and reading an article on the subject in Rug Hooking Magazine.  There's nothing wildly original about my method, but if you've never done it before this blog might be helpful.

So...here were my Popham Beach Roses coasters hot off the hooking frame.  I would like to note that I should have hooked them a little further apart for ease later in the process, but they did work out fine:


It probably goes without saying that the next step is steaming them, but...you know the drill.  Put a damp cloth over the hooked pieces and then gently blot them down on both sides with an iron.  Note that my iron may be older than I am (and that's sayin' somethin') - it's a vintage find that was with my lake camp when I bought it - and it works a lot better than the lightweight pieces of junk they sell today.


To me it's always like a miracle of the universe how the wool kind of pulls itself down and in, and here and there, and integrates itself in to a much better looking piece once the steam is applied.  It's not terribly evident in photos, but it's very obvious in person.


After this I take the coasters and lay them top side up on a piece of waxed paper.  I use plain Elmer's Glue and (usually with a brush but sometimes with a finger) I run the glue all around the edges of the pieces.  The purpose of this is to keep the linen from raveling when it is later cut.


(A note about the pretty syrup pitcher sitting in the equally pretty saucer on the Hoosier cabinet:  those were thrown and finished by my novice potter/ceramicist husband, Bill.  I am encouraging him to open an Etsy shop of his own but he's not biting on that idea yet...)


The glue is best applied to both sides.  I do the top side up first so that when I turn them over there's a little air gap for drying.  I put down a new sheet of waxed paper when I flip them to make sure no glue that may have gotten on the old paper can get on the wool.


At this point, you have an option.  You can either go have a cup of tea, visit with friends, do the laundry, feed the chickens, whatever, while the glue dries, OR, you can use a hair dryer on warm to expedite the glue drying.  I did that today because I needed to get these coasters shipped.

Once they are dry, cut them apart leaving maybe 1/4 to 1/2 inch around the edges.  Don't throw away your scrap linen!  I have been admonished to keep it by a) my mentor Connie who uses it sometimes to extend a piece for better fit on a frame and b) by Lou, owner at the Secret Garden gift shop in Oxford, Maine who said she has crafters who use it to make little primitive art pieces.  So...waste not, want not I guess!


Next, cut a piece of a double sided heat activated plastic about the size of your coaster plus edge.  I use something called "Heat Bond," but I know other hookers and crafters use other products that they have a preference for.  This material is inexpensive and easy to find, and just as importantly, easy to work with.  I've tested my coasters and trivets and this material also keeps any moisture off the surface you are using the item on.


Then, place the Heat Bond plastic side down on to the back side of the coaster, apply heat with a medium iron, and let cool for a moment.  Peel back the paper and you'll see that the back side of your coaster is now plastic coated.


Next....take the wool you'd like to use as your backing (I used a pretty black herringbone I dyed last spring) and place it over the plastic side.  Again, apply heat from the iron.  I find that using a damp cloth between the backing and the iron creates a steam effect that helps transfer the heat through the wool backing and creates a nice tight bond.


Let it cool and this is what it's going to look like:


This next step is, I think, the scariest part but you get used to it.  Trim away the excess around the edges very carefully, getting as close to the edge as you can without nipping any of your loops.  My mentor/teacher, Connie Fletcher, uses pinking shears and leaves a cute little pinked edge.  I have also seen that method written up in magazines.  For these pieces I opt for a straight edge invisible from the top, but you could do anything you liked.


After I have the edges cut I go and nip the corners to itty bitty 45 degree angles because it makes them look a little tidier to me.  (This photo was taken on my sons' air hockey table - kinda stark white Etsy-ish, no?)

 This is what they look like from the side.  I do not mind, and the people who have purchased or received these as gifts don't mind, that the linen is visible from the sides - in fact, I like the primitive look of that.  IF you do mind it though, I'm sure an overstitch binding could be applied, or some other solution.  For these pieces, I've kept it simple and I do think they're still pretty.


So that's it.  In my case, I wrapped these up nicely and shipped them to our customer.  In your case, you might want to mix a gin and tonic and test out your handiwork.  :)    Let us know how you finish pieces like this, and happy hooking!    ~ Beth


Saturday, October 6, 2012

Custom Project - Part 1

Well, with the gracious permission of my custom rug customer, Kate, I am going to document this process from beginning to end.  I will get out there right up front that I'm not sure I will ever do a custom commission again...not because it's too much work, or too little pay, or anything like that - this project is fine in those regards.  It's about the enormous sense of responsibility I have to really get this right.   That didn't sound good either, did it?  I do not mean to say that I don't always want to get a piece right...but when a customer comes to you with an idea for a design that you know is about experiences and memories near and dear to them, well...it's intimidating.  But who knows - I may finish this one and think, "Wow, maybe I should do that again."

A little background info on the design:  This pattern was drawn by Daniel Rosenburg, Jen's husband, because I was unable to get it to a state where I thought it did the subject justice.  I draw chunky, very primitive designs - that's my thing.  If you go to our Etsy shop you'll be able to see the difference in style between what I draw and what Dan draws.  Still, I took a stab at this one, working from photos Kate gave me, and then she and I sat down together to fine tune where elements might be out of proportion or place.  This was a great excuse to meet with a great woman at the great Cafe Nomad on Main Street in Norway, Maine - that's a lot of greats, but they're all justified!  After that I took the pattern home and started tweaking.  And tweaking.  Aaaaaaand tweaking.  And vowing to take a drawing course some time soon at the local community college (which I still plan to do).  And more tweaking.  And then....I contacted Jen and Dan with a cry for help.  Dan agreed to rescue me so I sent my version, all the photos, a video Kate had taken of the subject, and a long and involved email out to him, along with a check for his services lest I feel any more like a dweeb than I already did.  Dan assessed the multi-element design as a request to fit a "five pound ham in a three pound can" task, but proceeded to pull off the following drawing, which I think is pure genius:

Copyright 2012 Parris House Wool Works/Daniel Rosenburg
This pattern depicts Kate's view from her husband's family's gorgeous lake front home in our fair region, northern New England.  Our family also has a waterfront cottage, and I grew up summering on a lake in Maine, so the importance of this spot for them and the love they have for it is something I can easily relate to.  Thus...the sense that I need to really make this beautiful.  After receiving it back from Dan, I presented it to Kate, who declared it wonderful (yay!) and I set about transferring it to linen.  But...hold the presses!

Again, I'm a chunky, primitive kind of girl.  (Oh dear...that came out all wrong...)  My patterns are relatively simple, so tracing them under bright light by just putting the linen over the design has always worked for me.  Not with this project.  I tried multiple places in the house, with bright sunlight, lamps, big flashlights - I just could not see the pattern well enough in enough detail to properly get it on to the linen.  (Up side?  Hubby has promised to build me a light table, which will also come in handy doing photography for the Etsy shop.)  I called up Connie Fletcher of Seven Gables Rug Hooking - my mentor and eternally patient guru - who told me to come on in to the shop she co-owns, Artful Hands Fiber Studio, also in Norway (aren't we lucky???).  Connie showed me the process of tracing the pattern on to dot covered sheer interfacing, and then tracing through on to the linen.  I know many of you reading this have done this before, but as Jen and I explained in our very first post - we are still learning.

Copyright 2012 Parris House Wool Works/Daniel Rosenburg

Copyright 2012 Parris House Wool Works/Daniel Rosenburg

Copyright 2012 Parris House Wool Works/Daniel Rosenburg
I will sheepishly admit also that I had to ask Connie to show me the best way to make sure a pattern is drawn on the grain, as I have had some occasional mishaps in the past making that happen (although please be assured that any pattern purchased from our shop is successfully drawn ON the grain).

Next came the fun part - choosing the wools.  I could have dyed my own wool for this project but it's just not necessary.  Seven Gables Rug Hooking has so many beautiful wools to choose from and Connie is such a master at dyeing that I felt that doing it myself would just add time to the process that by now I do not have - this rug is going to be a Christmas gift.  Here are some of the wools I chose yesterday, and stripped in to 6 and 7 cuts today.  My camera does not do them justice - the color saturation and richness of these wools is much greater than it appears in this photo.

Wools purchased from Seven Gables Rug Hooking/Connie Fletcher

So that's it - that's where I am.  Only one thing left to do, right?  I'm starting with the rocks.  Wish me luck!


What have you got on your hooking frame these days?  Please share!  I'll keep you posted on this project - happy hooking!  ~ Beth

Wednesday, October 3, 2012

Expanding Our Scope...

It's been a long time since either Jen or I have contributed to this blog, but make no mistake - we're still hooking!  It's just that life is so often hectic and often I personally feel like this:

Tesla doing one of the things that Tesla does best.
And yet...when I get my page view count from Blogger I notice that people are still tuning in to this blog...probably expecting some wonderful wooly content, only to find nothing new here, like an abandoned barn, somewhat empty and smelling of must.

So...what to do?  Well, obviously...we have to start posting again.  I asked myself the question: "Can we find something to post at least once a week that's hooking related?  Probably we could.  But then I thought some more and realized that much of what I find I have in common with other hookers goes way beyond rug hooking.  Hookers are often attracted to the art because it is a heritage art, something our foremothers (and some forefathers too!) took up not only as a practical matter for covering cold floors, but as a creative outlet and a way to record aspects of their lives and beliefs in colored wool.  Because most hookers I meet, and most artisans for that matter, value heritage I often find that they are also keeping other heritage arts and skills alive.

For example, I know rug hookers who farm or garden, raise livestock, knit, sew, quilt, needle felt, spin, weave, can and pickle foods, make soap & other household items, make jerkys and preserved sausage, restore old homes, participate in historical societies and reenacting, and collect and/or sell antiques and vintage items.  This is just to name a few activities hookers engage in that are related to preserving heritage activities and living a homesteading lifestyle to some degree.  Of course, there are others who do none of these things, and that's ok too.  

From here on out I promise we'll post more often - mostly about hooking but sometimes about some other heritage art or skill that we think may be of interest.  Feel free to share ideas and suggestions.  

Before I go, here's a peek at what we're working on right now - these pics are a little older - we're both further along on these projects now, or nearing completion:

Jen's 1796 House rug - design by Daniel Rosenburg (her hubby!) - pattern available in our shop

My Tesla's First Snow rug - pattern available in our shop

And, we just sold these on Etsy to a very nice woman in Kansas whose daughter actually collects hooked coasters!

Primitive Coaster Set - pattern available in our shop - similar finished set could be made to order

In addition, I have just purchased the linen and am starting to purchase the wool for a custom commission for a great customer!  Her pattern was also designed by Jen's husband, Dan Rosenburg.  If I get permission from the customer to show off her very special design and project as it progresses, maybe I'll share!

Hope everyone is having a beautiful fall...our foliage is near peak here in Maine.  I'll try to post some photos of that too!   Best wishes to all.    ~Beth


Saturday, February 25, 2012

Yet Another Addictive Aspect of Rug Hooking

My first wools, a selection of solid primitive colors, finished and stacked..
As Jen and I have made perfectly clear, we are newer to this art form than many of our readers, and as such we have only just dipped in to (pun intended!) hand dyeing our own hooking wools.  But now that we have, we're hooked!  Ok, ok...no more puns this post, I promise.

I thought for those of you who have not yet tried this, I would use this post to explain the basic process, but more importantly, to allay any and all fear or anxiety you may have about trying it.  I was very nervous - I thought there had to be some magic involved or some skill I could not possibly possess, but just as my hooking teacher had promised, it really IS easy!

I began by going to a local wool supplier we are fortunate to have in my area of Maine, the Oxford Mill End Store, and choosing three different yards of a neutral solid wool.  I thought that if I began with a light neutral solid, it would give me an idea of how the wool takes the dye and I could move on to colored and textured wool from there.  Actually, I bought six yards and sent three down to Jen, so we could simultaneously experiment.  I owed her money for setting up our web hosting and domain name, so it worked out great.  Our business accounting is so precise...

The next thing we did was order dyes from W. Cushing Company in Kennebunkport, Maine.  This company has been making fabric dyes since 1879 and I would encourage you to surf around their site - it's most enjoyable and informative.  I also purchased a dye recipe book to get started with, although I am now chafing at the bit to try some recipes of my own.  Additionally I ordered a set of tiny measuring spoons from Amazon with which to measure the powdered dyes.

Perhaps the needed item that most eluded us was the white enamel dyeing pot.  W. Cushing does carry them, but they are understandably expensive.  Jen's husband was able to find an old one at a vintage shop, and I had one that was, at the time, serving as a drain pot for one of my mother-in-law's plants.  In both of our cases, our husbands sprayed the interior of the chipped old pots with a white enamel paint and - yay! - both worked just fine.  The reason the white interiors are so helpful is that white allows you to see how much of the dye is being absorbed, the color of your wool as it develops, and when the water has cleared at the end of the process.  Still, I know people do use stainless pots and I do believe that would work fine as well.

So...now I had my wool, my dyes, and my equipment.  What I didn't have was any excuses not to try the process.  Step one is soaking the wool in a bath of warm water with just a little bit of dish soap.  I used Palmolive, but my instruction book called for Ivory.  It made no difference.  Here is my wool happily luxuriating in the tub.  All it needs is a glass of wine and a good book.

I cut the wool in to quarters and soaked it overnight, per the directions in my book.  Jen found instructions requiring only a two hour soak.

When the wool was finished soaking, I rinsed it thoroughly in room temperature water and took it downstairs to the kitchen.  I put the white enamel pot full of water and one added tablespoon of NON-iodized salt on to the stove to heat while I prepared the dye mixes.  Here is my color chart/recipe book and my assortment of Cushing dyes:


You'll notice that the instruction book is highlighted.  It's a simple process but I have a simple mind, so I found the highlighting helpful.  The dyes are easily measured according to recipe combinations and dissolved in boiling water, in the case of these recipes, one cup of boiling water (in a glass measuring cup).  My instruction book suggested using rubber gloves when handling the dyes; I think this is a good idea but would prefer surgical type gloves to dish washing gloves because the little packages do require a good sense of touch to handle.  My book also suggests heavier rubber gloves to handle the hot wool when you remove it from the dye pot, but I did not find this necessary.  I'll explain why when we get there.

Once you have your dye mixed with the boiling water, add the amount in your color recipe to your dye pot.  You do not, by the way, have to measure the clear water in the dye pot.  This confused me at first but I went on faith and sure enough, however much water I had in the dye pot was fine.  You do, though, have to have enough to cover the wool.  I opted to dye a half a yard at a time, or two quarters.  This was the recommended amount of wool per recipe in my book.  You may find instructions that vary.  In some cases the recipe called for adding the entire cup of liquid dye to the pot.  In other cases it was only 1/2 or 1/4 cup.  In those instances, I saved the excess dye in jars for another time and just labeled the lids with the recipe numbers:


(Those cool bottles with the small lids, by the way, are from the Pennsylvania Amish country.  We bought home made root beer in them on a vacation a few years ago from an Amish family.  It was pleasantly fermented.)

OK...so where am I?  I've got the dye in the white pot with the simmering water and the tablespoon of non-iodized salt.  Time to add the wool!  This is where I took a deep breath and hoped for the best.


I needn't have worried.  My instruction book called for simmering the wool in the dye bath from 20 to 35 minutes, but you can experiment and judge your own times.  Additionally, if you stagger the times that different pieces are in the dye, you will get various shades of the same color.  Jen did this with her wools and here is one of her lovely results:


I wasn't as brave.  I kept it simple and dyed all of the batches the same amount of time.  When you are ready for the dyeing to stop, you add some white vinegar to the pot. (For those of you who did your own photo developing back in the day, this is akin to "stop bath."  Remember that?  It was essentially acetic acid after all.)  The amount you add is really not set in stone.  I've seen it as 1/2 cup.  I've seen it as "three glugs from the bottle."  You'll know when it's enough because the water will literally clear and the dye will be fixed in the wool; dyed in the wool, so to speak.  Simmer the wool for about 20 minutes after adding the vinegar and then it will be time to remove it from the pot.


Here's where I improvised - successfully.  I took tongs and pulled my wool pieces out of the pot and on to a stainless cookie sheet to cool to room temperature:


The water that drips from the wool at this point is perfectly clear.  Do not rinse the wool in cool water at this point!  If you were to do that the wool could very well "felt" and become too thick and dense for hooking.  I allowed it to cool to room temp on the cookie sheet and then rinsed it with room temperature water.  After that, I just threw it in the dryer on medium heat with a towel and when it dried, it looked like this:


Notice the blue & grayish wools in the top row.  They were actually done in the very same dye bath, but as I said, I had three different wools I was working with and they took the dye completely differently in that recipe.  I was actually quite happy to have such a varied result - that was a good learning experience.

So this weekend I'm going to try a textured wool.  I went over and got this piece:


This is a single yard.  I am going to overdye 1/4 of it black for use as a backing on some 8"x8" trivets I am hooking.  The other quarters I am going to use for color overdye experiments.  This wool is a-soaking as we speak.

Here are Jen's other shaded wool results:


All of our finished hand dyed wools are available for purchase on our web site.  We will be adding more as time goes by, plus it occurred to me to haunt the used clothing shops for old wool items no longer suitable for wear.  One studio I visited in Nova Scotia last summer was offering old Pendleton shirts and skirts for cutting in to hooking wool.

Please share your wool dyeing methods and experiences with us!  We'd love to see your results and find out how your methods may differ from ours.  Jen's method was different from mine.  There seem to be - within certain solid guidelines - several ways to approach hand dyeing. So, if you haven't done it before, give it a try!

Friday, January 27, 2012

A Family of Artisans

Irene Adams, winner of Cumberland Fair's "Best in Show"
award for this rug she hooked.  Pattern by  Seven Gables
Rug Hooking of Paris Hill, Maine.
When I first started rug hooking, not all that long ago, I was immediately struck by the camaraderie that existed in the hooking, and larger fiber arts, community.  As my teacher sat with me on the comfy sofa in our local fiber arts shop, other fiber artists - mostly knitters and hookers - flowed in and out of the store.  Some were there to ask advice, some were there for supplies, and some just wanted to sit down, have a cup of coffee and work on their latest projects at this home away from home.  We are blessed to have this resource in our small Maine community, and I have found it to be a tremendous benefit as I continue to learn my craft.

One of the women I met this way is Irene Adams, pictured above.  Irene is a wonderful artisan who, as you can see, won well deserved recognition for "Best in Show" at the 2011 Cumberland Fair in Maine.  When Irene was looking for a way to sell some of her pieces, we were more than pleased to be able to feature her work on our web site at Parris House Wool Works.  Her first piece for sale in our shop is a sweet 12" x 16" Seven Gables heart design.  Please take a moment to look it over:

http://www.parrishousewoolworks.com/category_10/Lovely-Offerings-by-Other-Artisans.htm


I can't help but think this would be a delightful Valentine's Day gift.   Interestingly, this Seven Gables pattern was the same one I learned to hook on.  My version has a deep charcoal & black background.  I have also seen this pattern hooked by its designer, Connie Fletcher, and it looks different still.  One of the things I love about this craft is that each piece is such a strong reflection of the woman (or man!) who hooked it.  A hooked rug is not just an inanimate object - to a large degree one can sense the spirit of the rug's maker in looking at the color choices, the loops, the hooking style, binding choices, and other elements.  Rugs are individual, like we are, and yet instantly recognizable from across a room as belonging to this unique genre of North American hand craft.

In the course of launching our web page, our Etsy shop, and our Facebook and Twitter pages, we have been contacted by rug hookers from across the USA and Canada.  I can honestly say that there is an instant sense of family, of recognition, when one "hooker" encounters another, whether in person or on-line.  This is tremendously rewarding.  We are very proud to introduce Irene, another member of this great family of artisans, to you.  - Beth