Wednesday, January 29, 2014

A Very Special Rug Story, Dedicated to Liz and Her Family

 One of the most challenging things Jen and I do in our work is take on custom projects for our customers.  They are challenging because we are always so hopeful that the work of our hands matches the vision in our customers' minds and hearts when all is said and done.  We recently had the opportunity to create a rug from the artwork of a very wonderful young woman, Elizabeth, who passed away from this earth last year.  This is the most meaningful work we have yet had the privilege to do in our new company, and we are so grateful to Elizabeth's aunt, Jeanine, for approaching us and entrusting us with this project.  I would like to tell the story of this rug's development here, but more importantly, at the end to include Elizabeth's story as it relates to the rug as told by her family through one of her sisters, Nicole.

Last fall I received an Etsy message from Jeanine asking if I could make a rug using the following images:




I had made a rug for Jeanine in the past, our "Tesla's First Snow" pattern, and enjoyed working with her so much.  Also, upon seeing this beautiful, colorful, and seemingly whimsical work, I immediately wanted to do the project.  Jeanine explained that the original sketch was by her niece, Elizabeth, and when I expressed my delight in Elizabeth's talent, she told me some of the story behind the art.  The color interpretation of the sketch was done by artist Jessica Breedlove, who kindly gave her permission for us to use it as the color planning basis of the rug.  Jessica's web page is: http://www.kidsart2canvas.com.

Jeanine asked that the rug be 2' x 3.'  In order to create a pattern for it in that size, I emailed the images to Jen's husband, Dan Rosenburg, who was able to enlarge the image and put it on to a 2' x 3' paper for me.  Dan mailed that from Tennessee to Maine for me to work with.  Dan sent a pencil sketch with a lot of detail in it, so that I could overdraw it in marker to include whatever detail level I thought it might be possible and desirable to hook.  Here it is after I overdrew the sketch.


The next step was to get it on to the linen.  I thought I was going to have to use red dot transfer fabric for this process, but as it turned out, I was able to see the pattern well enough through the unbleached primitive linen that we use as our backing.  


The story of the rug's creation is pretty straightforward from there, although most of the wool, probably 95% of what was used, I hand dyed specifically for this rug.  Much of the color variation you see in the completed piece is due to hand dyed mottling in the fat quarters that I used.  The trees, for example, were hooked with a couple of very mottled greens.  I hooked it mostly in a size 6, although the Forget-Me-Nots and details on the cathedral dome had to be hooked smaller.   The rug is simply bound in blue twill binding tape, and labeled as shown below to credit Liz with the design.  Here are some in-progress photos, which I was texting to Dan and Jen throughout the process for their valuable input and guidance.  


Here is the rug completed in a photo Jeanine asked me to take of myself with it in the Maine studio.


Infinitely more importantly, here is a photo of Elizabeth's family with the rug in their home at Christmas time.


Most importantly, here are some photos of Elizabeth.

Elizabeth at a spaghetti dinner fundraiser.

Elizabeth and her beautiful sisters.
I want to end this blog post with what matters most, the story of how Elizabeth herself came up with this design and what each of the elements meant to her.  It is very moving, and it is impossible for me to read it, even now, without some tears.  Having lost a sibling young myself, I feel so much for this family, including with the sadness, I want to say, the joy of simply having had a beautiful soul like this among them even for  much too short a time.  We don't forget, and we don't stop missing our loved ones, but I think I can confidently say they are with us - integral to who we are - forever.  This is Liz's sister Nicole's essay on the meaning behind Liz's art, on behalf of the entire family:


"My family cannot even begin to explain how grateful we are for the beautiful rug that was created to pay homage to my sister, Elizabeth. Elizabeth was diagnosed with a rare cancer, Rhabdomyosarcoma Alvealor, in November of 2012. She fought long and hard with multiple, major surgeries, chemotherapies, and radiation treatments. Elizabeth ended her battle with cancer August 16, 2014, a month and one day after her twenty-first birthday.


The rug we received for Christmas, a lovely gift from our father’s family, is an original design that Elizabeth drew. Elizabeth was treated at Children’s Hospital in Pittsburgh, where she was introduced to art therapy. She participated in a program called: “Art 2 Canvas” in which she sketched an image, met with an artist, and had it her vision come to life on canvas. That vision is the one displayed on the rug.


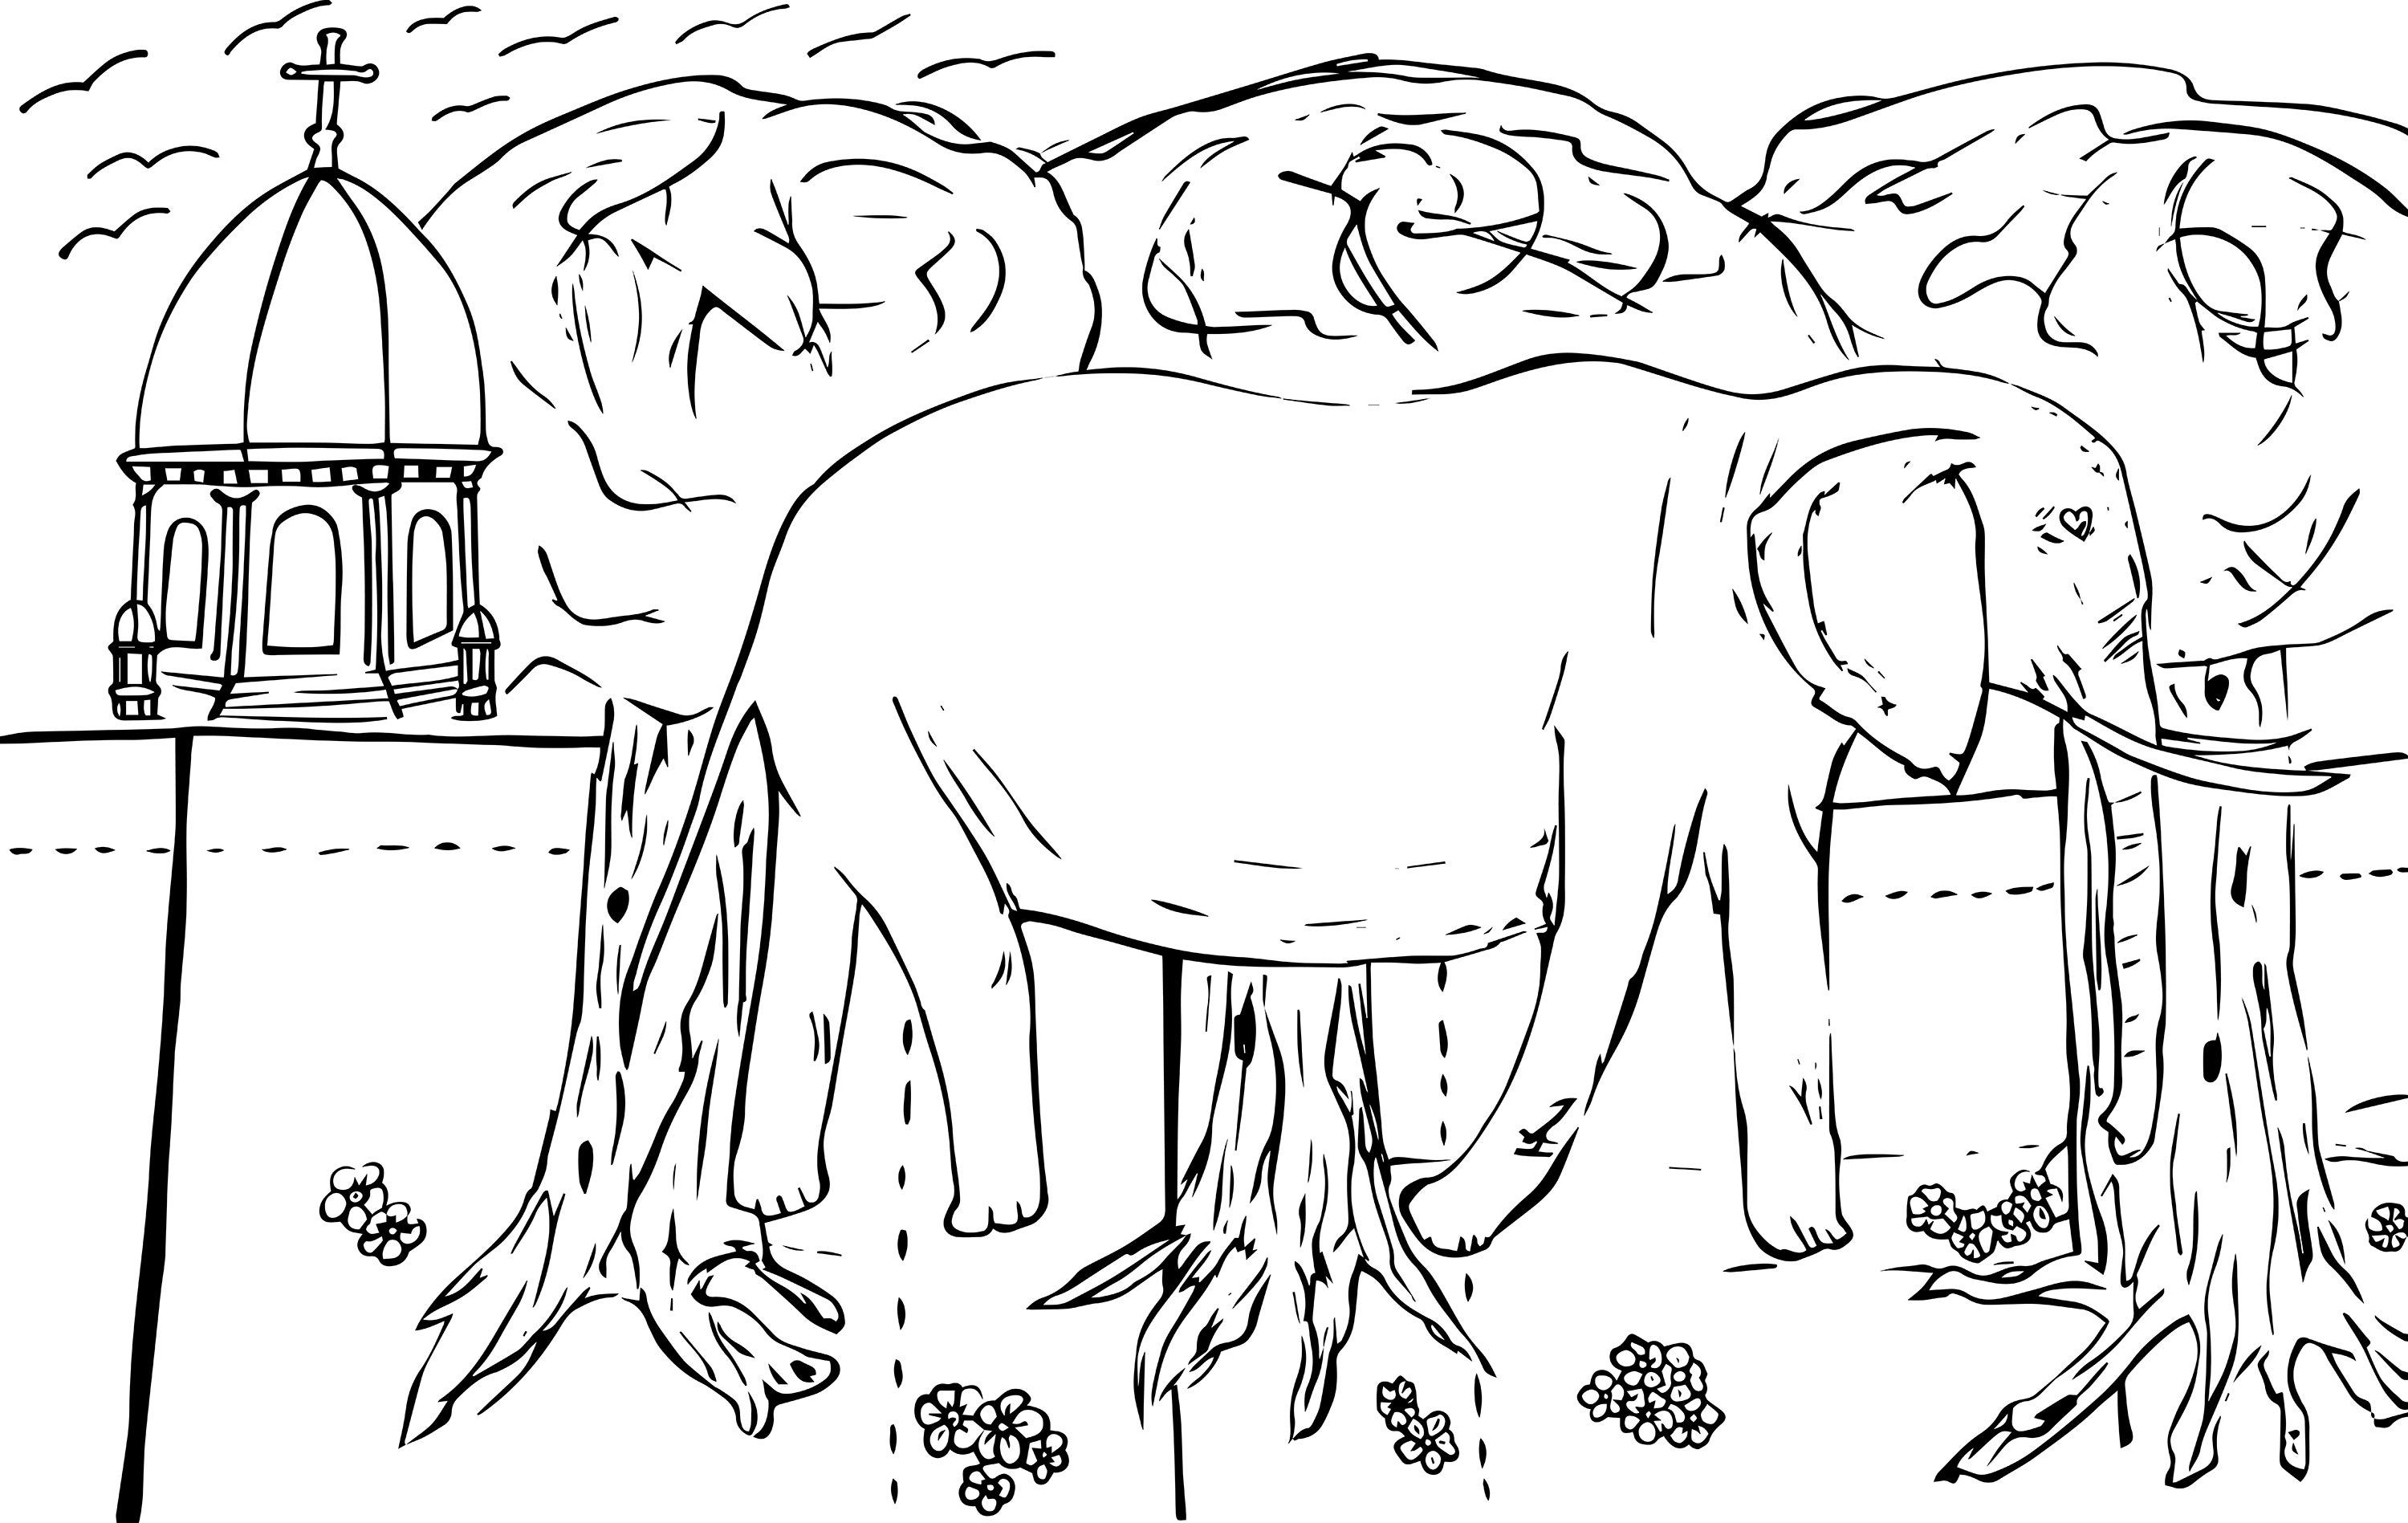
Elizabeth’s drawing has a lot of symbolism and meaning: it truly paints a picture of her life. I wanted to share her drawing with you:


The Elephant- represents a 9 year old girl that truly helped and mentored Elizabeth during her time at Children’s Hospital. Kylah, although tiny, was extremely strong, filled with power, and wise beyond her years, much like an elephant.


The Cathedral Top- represents the University of Dayton where Elizabeth was studying. Elizabeth loved her school and will forever remain a Dayton Flyer.


The ground- represents a rugby field. Elizabeth joined the University of Dayton rugby team her freshman year of college and absolutely loved the sport.

The Forget-me-nots- represents the flower of her fraternity AphiO. This service fraternity became a huge part of Elizabeth’s life and she truly embraced their motto: “Be a Leader, Be a Friend, Be of Service”.

The Birds- each bird represents a special person in Elizabeth’s life whom passed before her.
 
The Oak Trees- represents her three sisters. Each tree has an initial sketched into the leaves N for Nicole, R for Rachel, and C for Christina.

The Blue Heart (the elephant’s eye)- represents her parents. The blue heart is a symbol of their unending love and support throughout her journey with cancer. "

I want to thank Elizabeth's family for offering us permission to share this story on-line with our friends and customers.  They are brave and generous in this, and we are very grateful.  Wishing everyone a wonderful day, and happy hooking.  - Beth


Thursday, November 7, 2013

Sarah Ann Marven 1830s Sampler in Memory of Her Mother


Hi.  It's Jen.  I'm so excited because I just bought my first antique sampler!  
This was dear to my heart because I lost my mother to breast cancer on January 5th of this year. 
I knew I was meant to own it. 
It dates from about the 1830s and has some damage but overall it's still quite extraordinary. 
It was stitched by a child named Sarah Ann Marven.


The verse:
My Mother
She being dead yet speaketh
What say the happy dead
She bids me bear my load
With silent steps proceed
And follow her to God
Till life's uneasy dream
In rapture shall depart 
She bids me give like her
To Christ my youthful heart


And here is the full sampler!
I adore it and hope to make a reproduction cross stitch sampler kit for sale in our shop
soon.
I hope this has touched your heart as it does mine :)


Wednesday, October 9, 2013

Save the Whale! A Restoration Project

Every once in a while we get a request for a special project or custom design.  Each time this happens, we are presented with new challenges, but always rewarding experiences.  This time was no different.

I received an email from a customer who asked if I could possibly finish and restore this hooked rug her grandmother had started working on decades before:


As you can see, the pattern was a vintage Lib Callaway design called "Cape Whale" and was thumb tacked to a wooden frame.  Her grandmother's careful hooking was evident, and I took a deep breath and replied, "Yes."  My next contact was with Connie Fletcher of Seven Gables Rug Hooking, who has been my teacher and mentor in this craft, to see if she had any words of wisdom as I proceeded.

I expressed my concern that the original burlap of this pattern was becoming a quite brittle and deteriorated.  Connie suggested that I put a new linen backing on to the piece and then finish the hooking by hooking through both layers.  I carefully safety pinned the linen on to the back and proceeded to hook as suggested, being careful to keep the layers flat to one another as best I could.  This is what it started to look like as I hooked through the layers, around the existing work of the original artisan.  It was important to me not to undo anything that she had done.


At about this point in the hooking, I realized that the wool that had come to me with the original kit for the sky was going to be seriously short.  This required that I take a break and carefully hand dye some new wool to match and blend with the existing colors.  Here is where I was when I stopped to dye some more:


You'll note that I hooked the sky in horizontal rows, which is akin to a style I've seen used in the Canadian Maritimes.  It's not my usual style to hook this way, but the original hooker had started her sky in this manner and it was my goal to hook this piece in such a way that my loops and style would look like hers.

I feel as though I did a pretty good job of getting a seamless blend with the new wool, and when the hooking was complete, it looked like this, front and back (this being prior to steaming):


The back of this piece shows clearly the areas that I hooked.  Anything missing from this view was already hooked by the original artisan.  Now it was time to steam and serge the edges.  This is normally a pretty basic affair, but in this case I was trying to preserve the original pattern markings and tags.  I could not save them on the piece itself - they had to be cut off for binding - but I knew that I could at least save the pieces as a record of the age and origin of this design.  This required pretty careful serging, especially in the lower right corner where the "Lib Callaway" mark came pretty close to the hooking.  Here is the serged piece.  The serging process, in this case, also served to sew the original burlap to the new linen backing at the edges.


I chose to use tape binding for this rug, as I think that is a classic and traditional treatment for a vintage rug.  I used a matching blue.  This photo shows the binding stitched in place, but not yet pressed.


Now it was a matter of dealing with the original pieces I sought to preserve, and also adding a label to the back.  I had originally considered sewing the original pattern markings on to the back, but their relatively fragile condition made me hesitate.  I consulted with Bruce Little of the Frost Farm Gallery in Norway, Maine, who provided an archival plastic envelope to hold the old pattern markings:


I also chose not to put one of our usual embroidered Parris House Wool Works labels on to the back of this rug.  I felt that that would not be appropriate given that it is not our design, nor were we the original artisans working on this piece.  Instead, I chose an old fashioned, hand written muslin label and hand stitched it on:


This is the finished result.  It will be a Christmas gift from my customer to her grandmother, and I can't wait to hear about how it is received!


I hope this post has given you some ideas on how you might similarly restore some partially finished heirloom of your own family's.  Best wishes and happy hooking! - Beth

Sunday, October 6, 2013

Hampden, Maine Hook-In, Presented by The Keeping Room

When Toni Philbrick, owner of the beautiful hooking, penny rug, and antique studio, The Keeping Room in Hampden, Maine (just outside of Bangor) invited me to be a vendor at her annual fall hook-in, I was delighted.  Toni is a wonderful person, a magnificent artist, and a great teacher of her crafts.  In addition, her shop is on the site where Hannibal Hamlin, first VP to President Lincoln, had his law office.  Hannibal Hamlin's birthplace is in my village of Paris Hill, over 100 miles away, so I was interested to see where his law office had been, and checked that out on the way.  This event, however, was held about a mile or so away from the shop, in the gathering hall of the community's Methodist Church.  I had a great day there, met some of the women who will be coming to our own Paris Hill Hook-In on October 19th, and made some great connections and - wow! - great sales.  What follows are some photos from this event.

There were three vendors of wooly goodies at this event.  This is Toni's table, from her shop, The Keeping Room.  I was very tempted by her penny rug kits, and may yet call her up and order one.


This is the table of  Wool N Ewe  from Ellsworth, Maine.  I met owner Al Jenkins for the first time, which was a pleasure.  Al is an extremely talented man, and was also very open and easy to chat with.  Please visit his web page to see more of his beautiful wares.


And this was my table.  What you can't really see too well in the photo are all the things I had on the shelf behind all that Parris House Wool Works wool!  I had Debbie Howe's beautiful knitting bags, Edna Olmstead's frame covers and snip pockets, Sunset Haven Pottery's ceramic snip jars, and Bear Pond Wood Works' frames.  Wool Is Why's amazing yarn is in a basket in the foreground.  All of these things were hits with the ladies attending, which is a testament to all the great talent we have here in Western Maine.


Toni put on a beautiful breakfast and lunch.  There were nice baked foods in the morning, and for lunch she served a chowder, sandwiches, and a delicious cranberry laced salad.  For dessert the ladies were treated to apple crisp and ice cream!  The theme of the event was apples this year, and there was a fun "apple swap" where attendees could swap apple themed crafts that each had brought.  Here are the hookers enjoying this savory fall feast.


There was also a rug show, judged by the attendees' popular vote.  I regret that I can not tell you the names of the hookers and designers of each of these rugs, but it goes without saying that they are the intellectual property of each person involved in their creation and are not to be copied. The artists brought a great variety of rugs in many different styles and color palettes.


Here are some more.  Note that the two rugs in the center are the same pattern, hooked by different artists.  I absolutely love seeing how different a single pattern can look, given multiple interpretations.


The rug in the foreground of this photo was the winning rug.  I was so inspired by the braided binding on this piece.  This is a technique that I have yet to try, but this is certainly an extremely inspiring example.


A very interesting part of the day's program was Toni's demonstration of penny rug making.  Below are examples of her work.  I left definitely wanting to try out this traditional wool craft.


This hook-in is held every October and would be a wonderful addition to your fall calendar.  For more information about this event or if you would like to be added to Toni's mailing list, contact her at (207) 862-3181. Registration is limited, so if you would like to go, inquire early!

Two weeks from now we will be holding our very own first annual Paris Hill Hook-In.  There are still a few days left to register, until October 10th, and we already have a group of about 55 registered.  For a registration form, click here.

Happy October and happy hooking!  - Beth


Monday, September 30, 2013

Homemade Lavender Laundry Detergent


Hi!  Jen again.  I wanted to share this recipe for making homemade lavender scented laundry detergent.  This November it will be two years that I've been making my own detergent.  I was inspired by my crafty sister Tiffany who has been making it MUCH longer.  The main advantages to homemade detergent is that you know exactly what's going in AND it will save you a couple hundred dollars a year.  Yep, you heard it correctly.  Making your own laundry detergent will save you lots of money! 

Many of my friends say they don't have time but if you have twenty minutes every two months to spare, you have time.  

A common myth about detergent is that you need lots of foamy, soapy bubbles to get your clothes clean.  Your homemade soap will clean and freshen just as well as store bought soap without any residual product on the clothing.  If you want a boost to whiten whites you can add about 1/4 cup of hydrogen peroxide to your wash or just spray around shirt collars and stains.  
If you find that you feel empowered making your own laundry soap, you can even make your own fabric softener and dishwashing detergent.  Look for that in an upcoming blog.

You will need the following items and ingredients:

1 cup of Borax
1/2 cup of Washing Soda
1/2 a bar of Fels Naptha or 1 full bar of your favorite soap
Pan to melt your soap
9 quart bucket
Large Pyrex measuring glass
Silicon or plastic spatula
Super cool vintage cheese grater or food processor
A small bottle of lavender essential oil (optional)
Two 1 gallon containers
A funnel or a family member/friend to help you balance the bucket while you pour

  Grate either a full bar of your favorite soap (I love Dr. Bronner's Lavender Soap) or 1/2 of a bar of Fels Naptha. 
 Measure out your Borax and Washing Soda. 

 Place your grated soap flakes in your pan.

 Add 6 cups of water to the soap flakes, turn on medium heat, and stir gently until soap is fully dissolved. 

 Next add your Borax and Washing Soda and stir until completely dissolved.  The mixture will begin to thicken into a gel. 

Turn off the heat. 

 Pour 4 cups of hot water into your bucket. 

 Carefully, pour the soap mixture into the bucket of hot water and stir until completely mixed. 

 Add 22 cups (or to the 8 quart line) of water to your soap mixture.  This is where the large Pyrex measuring dish comes in handy. 


 Add lavender essential oil (or your other favorite scented oil).  I use about 20 drops because my soap also has a lavender scent but you can add as much or little as you'd like. If I use Fels Naptha I rarely add essential oil because the smell is already wonderfully fresh.

Using your handy funnel, pour the soap in immediately. Don't go take a bath or sit down with your favorite TV program because the soap will begin to gel. You want it to gel in the containers and not your bucket because it may form clumps while you pour  and you want the gelled part evenly distributed between each jug. 

 And look!  You now have two gallons of detergent.  How easy was that? I usually let mine gel overnight but I have used it just a couple of hours after making.   You'll want to give it a shake each time before using it to remix the solution in case it separates a bit.  If it gets too gel-like, just add a bit more water and shake.  I use a regular liquid laundry detergent size capful for each load.  


For more information about making laundry detergent check out: www.thefamilyhomestead.com